This guide will walk you through setting up all the code and automated services that allow the robot to run. This guide should be followed once before students begin their course projects. All project instructions assume that the robots have been setup following the steps outlined here.
The Robotics 102 philosophy is that students should be able to get up and running with the robots with as few obstacles as possible. At UM, instructional aides setup the robots for the students. Each offering of the course should choose which installation steps, if any, will be the responsibility of the students. It is beneficial to create an image with the desired setup to save time.
Contents
- Prerequisites
- Step 1: Flashing the Image
- Step 2: Configuring the Robot
- Step 3: Calibrating and Flashing the MBot
- Step 4: Install the MBot Code
- Testing the Setup
Prerequisites
For this setup, you will need:
- A 16 or 32 GB SD card
- A monitor and a mini-HDMI to HDMI cable
- A keyboard and mouse
- An assembled MBot
- A fully charged robot battery
- A laptop connected to the internet
Before you begin, install the following on your laptop:
- VSCode
- NoMachine (download from NoMachine website)
The robot username and password are:
Username: mbot
Password: i<3robots!
Step 1: Flashing the Image
In this step, we will get a Raspberry Pi OS image on the robot.
- Download Balena Etcher to your laptop.
- Download the base Raspberry Pi OS image for the MBot to your computer. This is the standard 64-bit RPi OS image, but we have added a couple configurations (username, password, config changes, and a WiFi script).
- Flash the image to a blank SD card using Balena Etcher.
Step 2: Configuring the robot
At this stage, the Raspberry Pi is not connected to WiFi so we will need to configure it using a monitor, keyboard, and mouse.
- Prepare the MBot.
- Insert the SD card into the Raspberri Pi on your robot.
- Plug in a fully charged battery into the MBot. The barrel plug must be plugged into the Robotics Control Board (on the bottom plate), and the USB port must be plugged into the Raspberry Pi (on the middle plate).
- Connect the robot to a monitor using the mini-HDMI port located on the side of the Raspberry Pi. Connect your keyboard and mouse to the USB ports on the Raspberry Pi.
- Turn on the robot by toggling the battery switch.
-
Connect to WiFi. At the University of Michigan, this can be accomplished running the setup script in the terminal:
bash
     ./Desktop/SecureW2_JoinNow.run
Enter your credentials when prompted. If on a personal network, connect using the network dropdown menu. - Get the system utilities repo on the robot. We will clone a repo onto the robot which has a number of scripts to install necessary dependencies.
- Get the robot’s IP address. You will need to use the monitor and keyboard. Open a terminal then type
ifconfig wlan0to get the IP: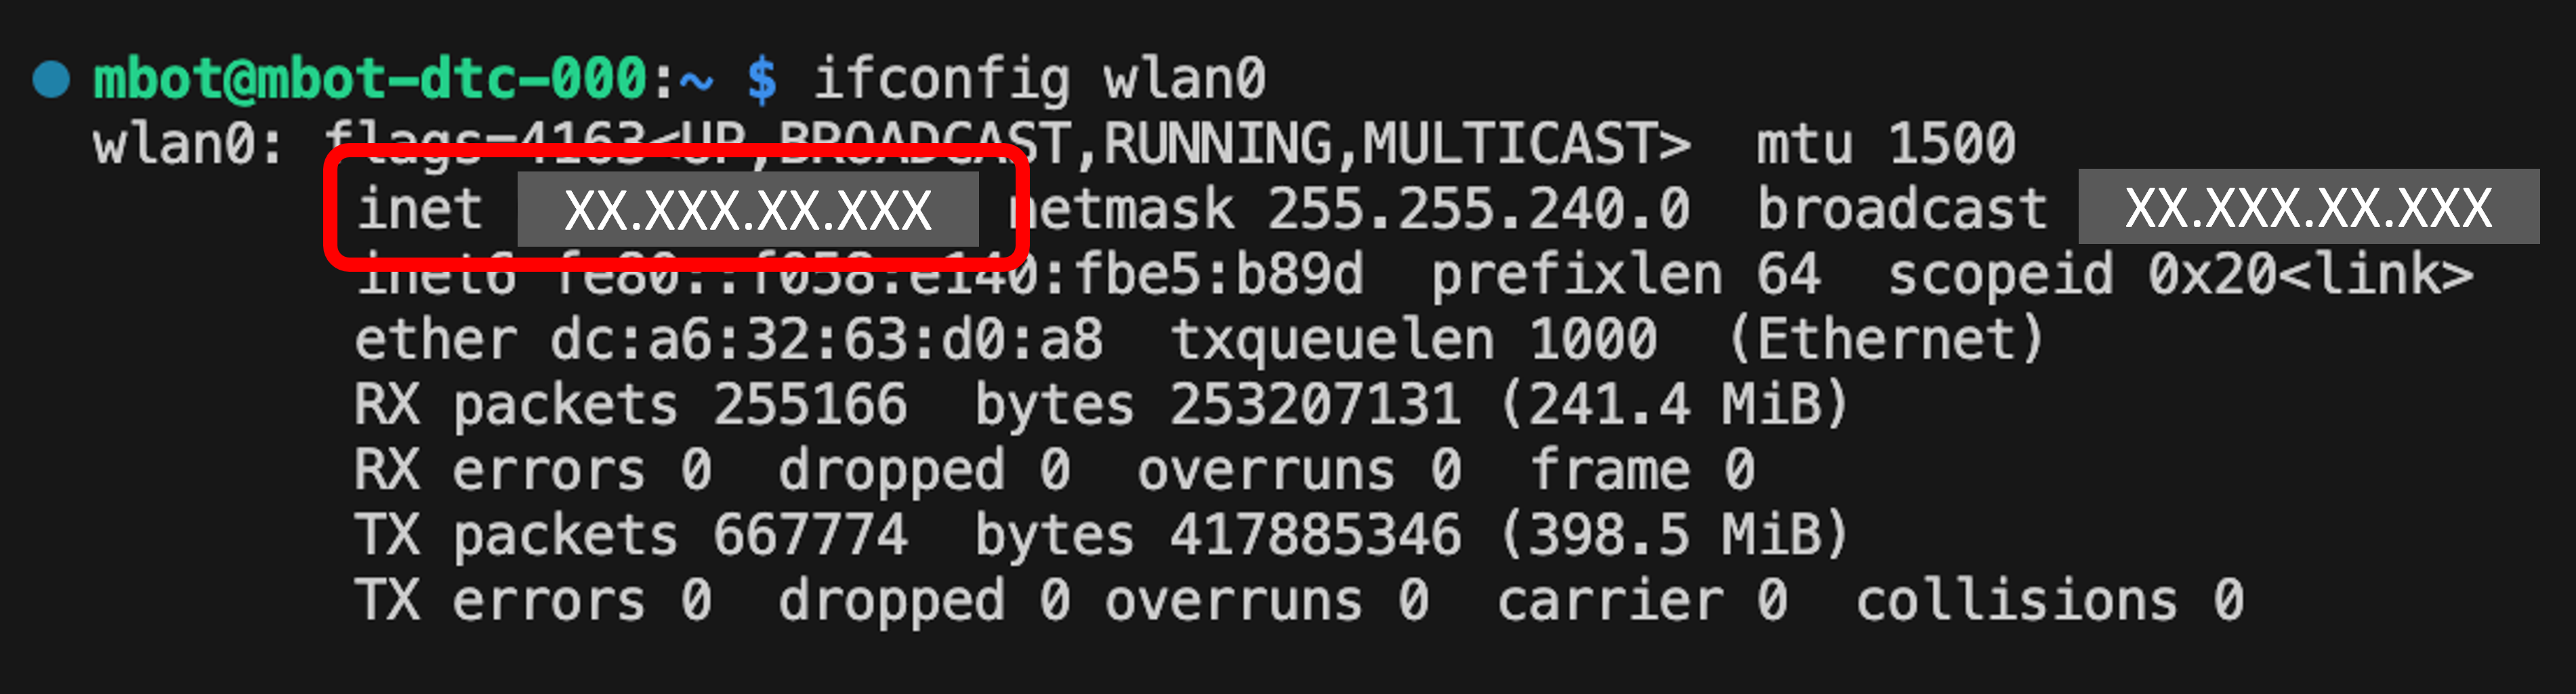
- Connect to the robot in a VSCode Remote session from your laptop. Instructions are here.
- Clone the repo
mbot_sys_utilsonto the robot. Open a terminal in the VSCode remote session, then do:git clone https://github.com/MBot-Project-Development/mbot_sys_utils.gitIf this is the first time you have cloned a repo with HTTPS in VSCode on your laptop, it will prompt you to give VSCode permission to connect to GitHub and ask you to login on your browser. Follow the prompts to grant this permission. Your credentials will be stored in your laptop’s credential manager. You will not need to enter your GitHub credentials again.
You must clone this repo in a VSCode terminal! The automated GitHub login will not work in a regular terminal (i.e. using the monitor and keyboard).
- Get the robot’s IP address. You will need to use the monitor and keyboard. Open a terminal then type
- Install dependencies and services.
- Install the dependencies, including LCM and NoMachine.
 cd mbot_sys_utils/
 sudo ./install_scripts/install_mbot_dependencies.sh
 ./install_scripts/install_lcm.sh
 sudo ./install_scripts/install_nomachine.sh
NoMachine is not needed for the MBot code to run, but it is very helpful for debugging later, and is required for these instructions.
- Setup the MBot configuration. First, copy the default config from
mbot_sys_utils:sudo cp mbot_config.txt /boot/Then, edit the config:
sudo nano /boot/mbot_config.txtGive the robot a unique hostname under
mbot_hostname. The hostname should match the hostname written on the MBot.You can also setup a home WiFi connection in this file, and update the IP registry repo. The defaults will work.
- Install the udev rules for the Lidar and Robotics Control Board:
cd ~/mbot_sys_utils/udev_rules ./install_rules.sh - Install the services needed to start the networking and report the robot’s IP:
 cd ~/mbot_sys_utils/services
 ./install_mbot_services.sh
Now, test that everything worked. Restart the robot with
sudo reboot. You will need to reload the VSCode remote window. The robot should now publish its IP address to the MBot IP registry (as configured inmbot_config.txt).The first time the robot is restarted, it might publish with the username
raspberrypi. This should be resolved by rebooting the robot again. - Install the dependencies, including LCM and NoMachine.
At this point, the robot should publish its IP to the registry each time it turns on. The IP might change occasionally. You can now use VSCode, SSH, or NoMachine to interface with the MBot by using the IP it reports to the registry. You should not need the monitor or keyboard and mouse anymore.
Step 3: Calibrating and Flashing the MBot
- Get the Pico firmware.
- Connect to the MBot in NoMachine. You will need the robot’s IP, which you can get from the MBot IP registry.
- Download the MBot firmware from here. You will need the
mbot_calibrate_omni.uf2andmbot.uf2files. Downloading the tests is optional. - Drag and drop the two files from your laptop to the robot’s desktop using NoMachine.
-
Calibrate the MBot. We will now flash the calibration script onto the Pico to calibrate it before we flash it.
The calibration script detects the motor and encoder polarity and then calibrates the motor coefficients. The robot will move around for this step so you will need clear space on the floor (preferably on the same type of surface that you plan to use the robots on).
Do not run the calibration script with the MBot on a table!!
- First, unplug the Robotics Control Board by disconnecting the barrel plug from the battery (leave the USB that powers the RPi plugged in). Also unplug the USB that connects the Pico to the Raspberry Pi.
- We will now put the Pico in flashing mode. Hold down the white
BOOTSELbutton on the Pico board (it’s near the USB port). With the button held down, plug the Pico’s USB cord back into the Raspberry Pi. Then release the button. The Pico should now show up as a device in NoMachine (see below).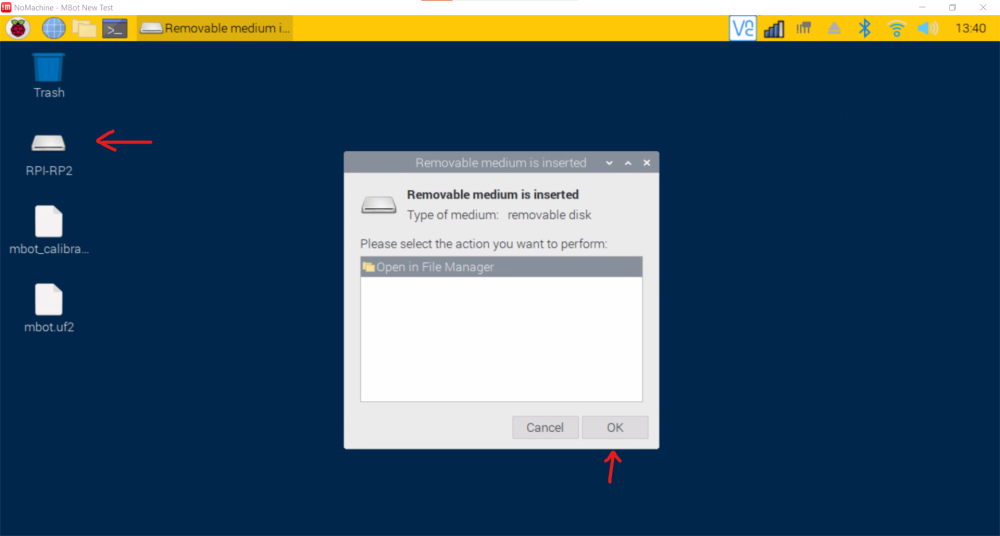
- Plug the barrel plug that powers the Robotics Control Board back into the battery.
- Place the MBot on the floor in a spot with at least 2 feet of clear space all around the robot.
- Open the Pico device folder in NoMachine. Drag and drop the script
mbot_calibrate_omni.uf2into the folder. The Pico will reboot automatically, and will then run its calibration routine. Don’t touch the robot while it does this procedure.
- Flash the MBot Firmware onto the Pico. The calibration script will have saved parameters onto the Pico’s memory. We can now flash the firmware that will run on the Pico during operation. We will be repeating the flashing procedure.
- Repeat steps 1-3 from the calibration instructions to put the Pico into flashing mode.
- Open the Pico device folder in NoMachine. Drag and drop the script
mbot.uf2into the folder. The Pico will reboot automatically.
Step 4: Install the MBot Code
This step will pull all the code utilities for the MBot Web App, SLAM, sensor drivers, and communication with the Robotics Control Board.
- Clone the necessary repos. There is a script to help you with this in
mbot_sys_utils. To use it, do:cd mbot_sys_utils ./setup_workspace.sh ~/mbot_wsNote: The script will pull in all the code repos. We will not use all of them in this guide.
- Install the base MBot code. This includes the message types and serial server which communicates between the Robotics Control Board and the RPi using LCM. The install script will compile the code and install it onto the robot. It will also install a service to automatically start the serial server on startup.
cd ~/mbot_ws/mbot_lcm_base/ ./scripts/install.sh - Install the MBot Web App. The web app is a useful tool for commanding the robot from your laptop’s browser.
- The installation requires you to install a program called NPM first. To do this, do:
 curl -o- https://raw.githubusercontent.com/nvm-sh/nvm/v0.39.3/install.sh | bash
 source ~/.bashrc  # Reload to apply changes.
Install the latest version of NodeJS (as of this writing, the latest version is 18):
nvm install 18Now you should have the
nodeandnpmcommand installed. You can check withnode --versionandnpm --version. - Install the web app dependencies:
cd ~/mbot_ws/mbot_web_app/ ./scripts/install_nginx.sh ./scripts/install_python_deps.sh - Build and install the app:
./scripts/deploy_app.sh
- The installation requires you to install a program called NPM first. To do this, do:
The web app should now be available by going to your browser and typing in the robot’s IP address.
At this point, if the firmware is flashed and the serial server is running, you should be able to drive the robot through the webapp. Toggle drive mode on then use the keys AWSDQE to drive the robot.
- Install the RPLidar driver. To install the Lidar driver, do:
 cd ~/mbot_ws/rplidar_lcm_driver/
 ./scripts/install.sh
This will pull some code dependencies, compile and install the code, and install a service to start the driver on startup.
- Install the MBot Autonomy code. The autonomy code includes SLAM and a motion controller program. Install it with:
 cd ~/mbot_ws/mbot_autonomy/
 ./scripts/install.sh
Again, this installs the binaries and services needed to run SLAM and the motor controller.
Testing the Setup
We’re done! You should test your setup by making sure you can drive the robot around and create a map in the web app.
You should be able to remove all the setup code if desired (mbot_ws and mbot_sys_utils).